Manual Container Launch
Tip
- Launching CD3 container using OCI Resource Manager stack is preferred method as it reduces the manual effort.
- With below method, users are required to clone the Devrel GitHub repo and execute commands to build and run the docker container.
⚙️ Prerequisites
- Git
- Any docker CLI compatible platform such as Docker or Rancher. See How to Install and Configure Rancher Desktop for reference.
- Local Directory - A directory in your local system that will be shared with the container to hold the generated Terraform files.
- OCI Tenancy Access as defined in Prerequisites.
Additional Steps needed when launching Container on a Linux Platform manually
Below commands create a user local user called cd3user on the VM and configures it. Also sets SELINUX to Permissive.useradd --u 1001 cd3user
sudo echo cd3user ALL=\(root\) NOPASSWD:ALL > /etc/sudoers.d/cd3user
chmod 0440 /etc/sudoers.d/cd3user
sudo setenforce 0
sudo sed -c -i "s/\SELINUX=.*/SELINUX=permissive/" /etc/sysconfig/selinux
sudo getenforce
sudo mkdir -p /cd3user/mount_path
sudo chmod 775 -R /cd3user
sudo chown -R cd3user:cd3user /cd3user
sudo mkdir /home/cd3user/.ssh
sudo cp /home/opc/.ssh/authorized_keys /home/cd3user/.ssh/authorized_keys
sudo chown -R cd3user:cd3user /home/cd3user/.ssh
sudo chmod 700 /home/cd3user/.ssh
🛠️ Steps:
1. Create local directory
- Create a directory on the system where container will be launched.
- This directory will be shared with the container while running it (in Step 6).
2. Clone the repo
- Open the terminal, navigate to the above created directory and create a new directory called oci_tools
- Navigate inside oci_tools dir. Git repo will be downloaded here.
- Run the git clone command as shown below. Note the period (.) at the end of command:
- Once the cloning command is executed successfully, the repo will replicate to the local directory at:
3. Build an image
Before building the image, review the optional Dockerfile settings. Update only the settings that apply to your setup.
Optional Dockerfile settings:
Open the Dockerfile:
| Requirement | Dockerfile setting | Action |
|---|---|---|
| Use CD3 with Jenkins on macOS | ARG USER_UID=1001 |
Replace 1001 with your local user UID, for example 503, to avoid permission issues. |
| Skip Jenkins installation | ARG USE_DEVOPS=YES |
Replace YES with NO if you do not want Jenkins installed during the image build. |
Build the Image:
To build the image, execute:
Important
Replace ${image_tag} with a suitable tag as per your requirements or standards, for example v2024.4.1.
The period (.) at the end of the docker build command is required.
4. Save the image (Optional)
- Run
5. Run the container alongwith VPN (Applicable for VPN users only)
- Connect to the VPN.
- Make sure to use version 1.9 for Rancher deskop, if not, install the latest.
-
Make sure to Enable Networking Tunnel under Rancher settings as shown in the screenshot below,
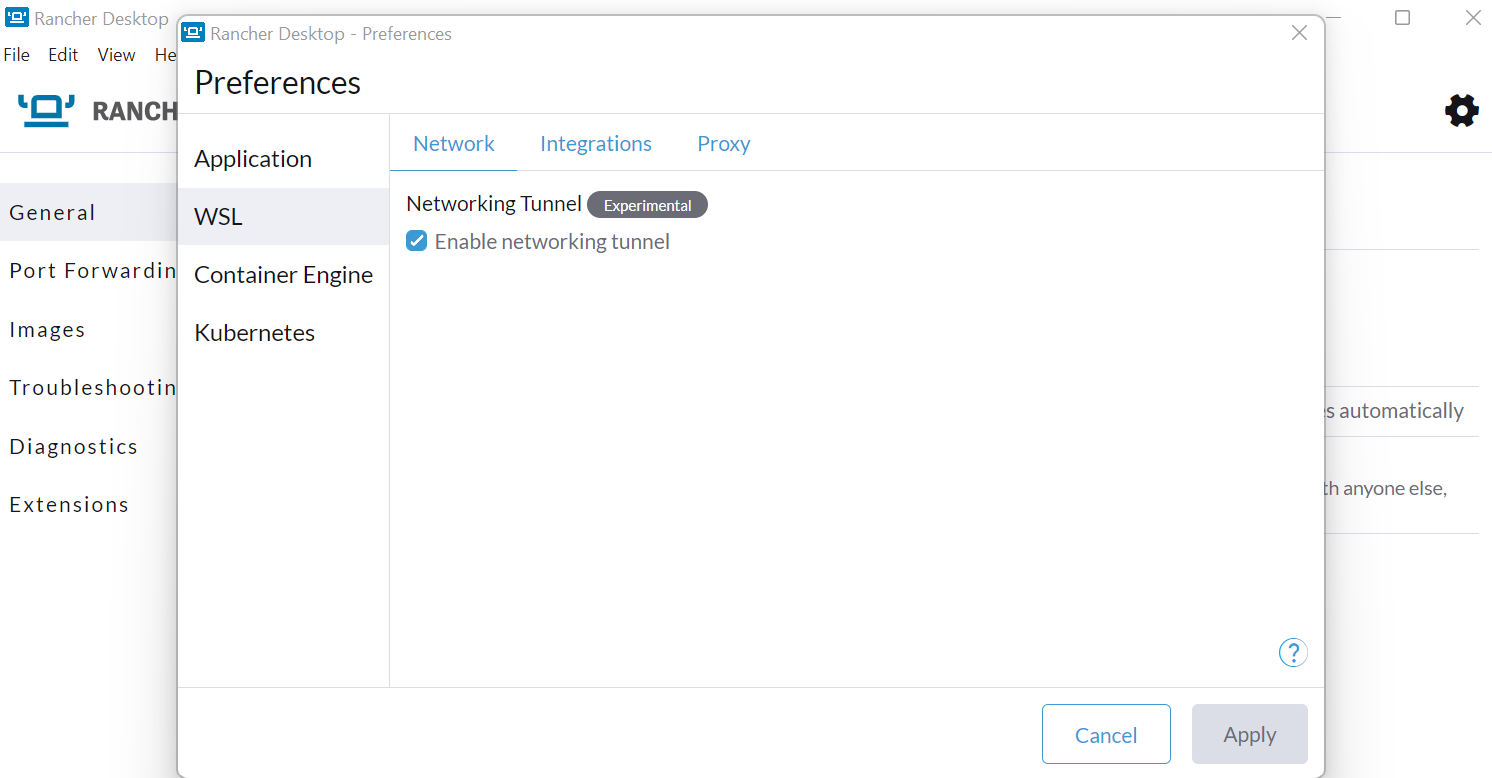
-
Login to the CD3 docker container using next section and set the proxies(if any) which helps to connect internet from the container.
6. Run the container
- Run
Ensure Secure Access!
If launching the container in cloud, make sure to use a private server or a bastion connected server with restricted access(i.e. not publicly available) to host the container.
-
Run
docker psto see running containers on the system. -
Run
docker exec -it cd3_toolkit bashto exec into the running container. -
Follow Connect container to tenancy for next steps.