Configure CD3 with Jenkins to Create and Export Oracle Cloud Infrastructure Resources
Objectives
- Launch the CD3 container with a single click and then create, export OCI identity, network, and compute resources using Jenkins pipelines.
Prerequisites
-
Oracle Cloud Infrastructure Identity and Access Management (OCI IAM) policy to allow user or Instance principal to manage the services that are required to be created or exported using the toolkit.
-
The user deploying the stack should have access to launch OCI Resource Manager stack, Compute instance and Network resources.
Task 1: Set up the Toolkit Container
- Click Deploy to Oracle Cloud to launch the OCI Resource Manager stack that creates the CD3 WorkVM.

- Accept the terms and conditions. Enter the network, compartment, VM name, shape and so on, for the workVM to be created.
Note: For security, specify a restricted source CIDR range to access the VM. Avoid using
0.0.0.0/0.
-
Check the Run Apply section and click Create to deploy the stack
-
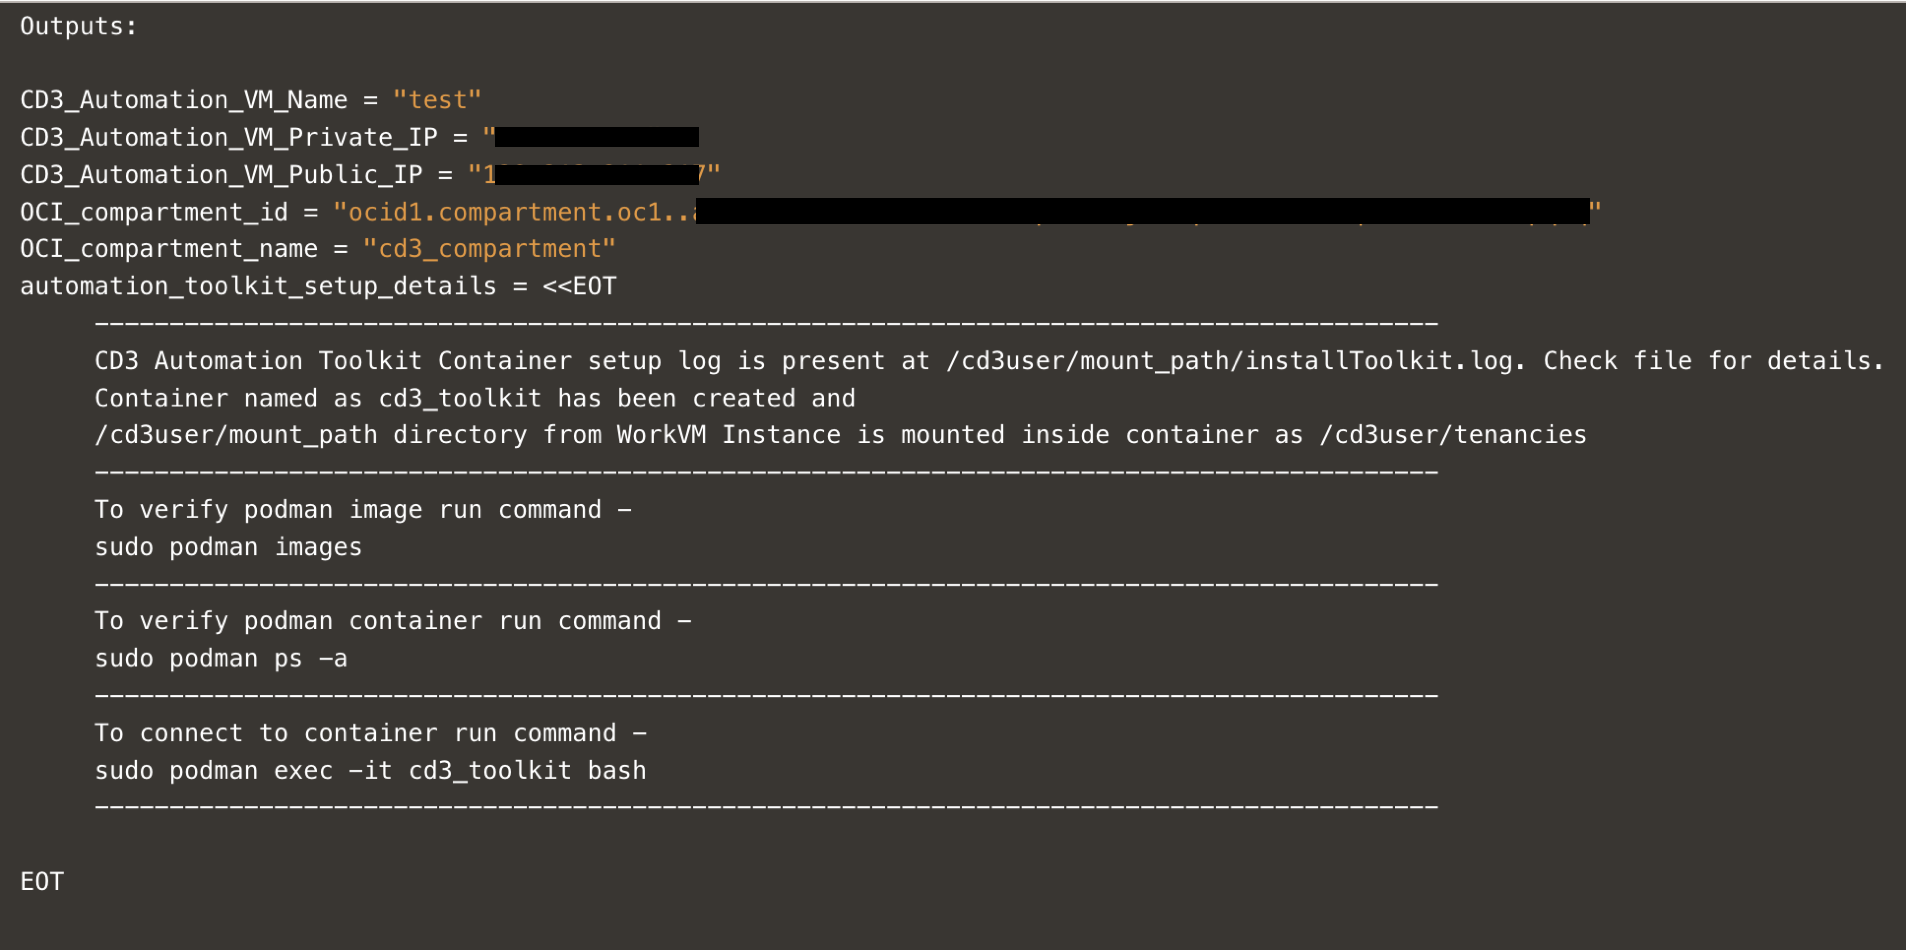
After the Apply job completes successfully, open the job logs and scroll to the end.
-
Locate the details for the created VM and commands required to log in to the toolkit container. The following image shows a sample output.
-
After logging in to the container using
sudo podman exec -it cd3_toolkit bash, proceed to Task 2 to connect the toolkit to your OCI tenancy.
Task 2: Connect the Container to OCI Tenancy
-
Inside the container, navigate to
cd3_automation_toolkit folderand open theconnectOCI.propertiesfile . -
Add the required configuration values in the Required parameters and Auth Details Parameters sections.
Note: This tutorial uses API key authentication. Leave the
auth_mechanismparameter at its default value. -
Go to the OCI Console, under User settings, upload public key to APIkeys. Fetch the required config values and update under the corresponding parameters in
connectOCI.propertiesfile.Place the associated private key in the container. -
Leave the default value for the
outdir_structure_fileparameter. This setting organizes the generatedauto.tfvarsfiles into service-specific directories.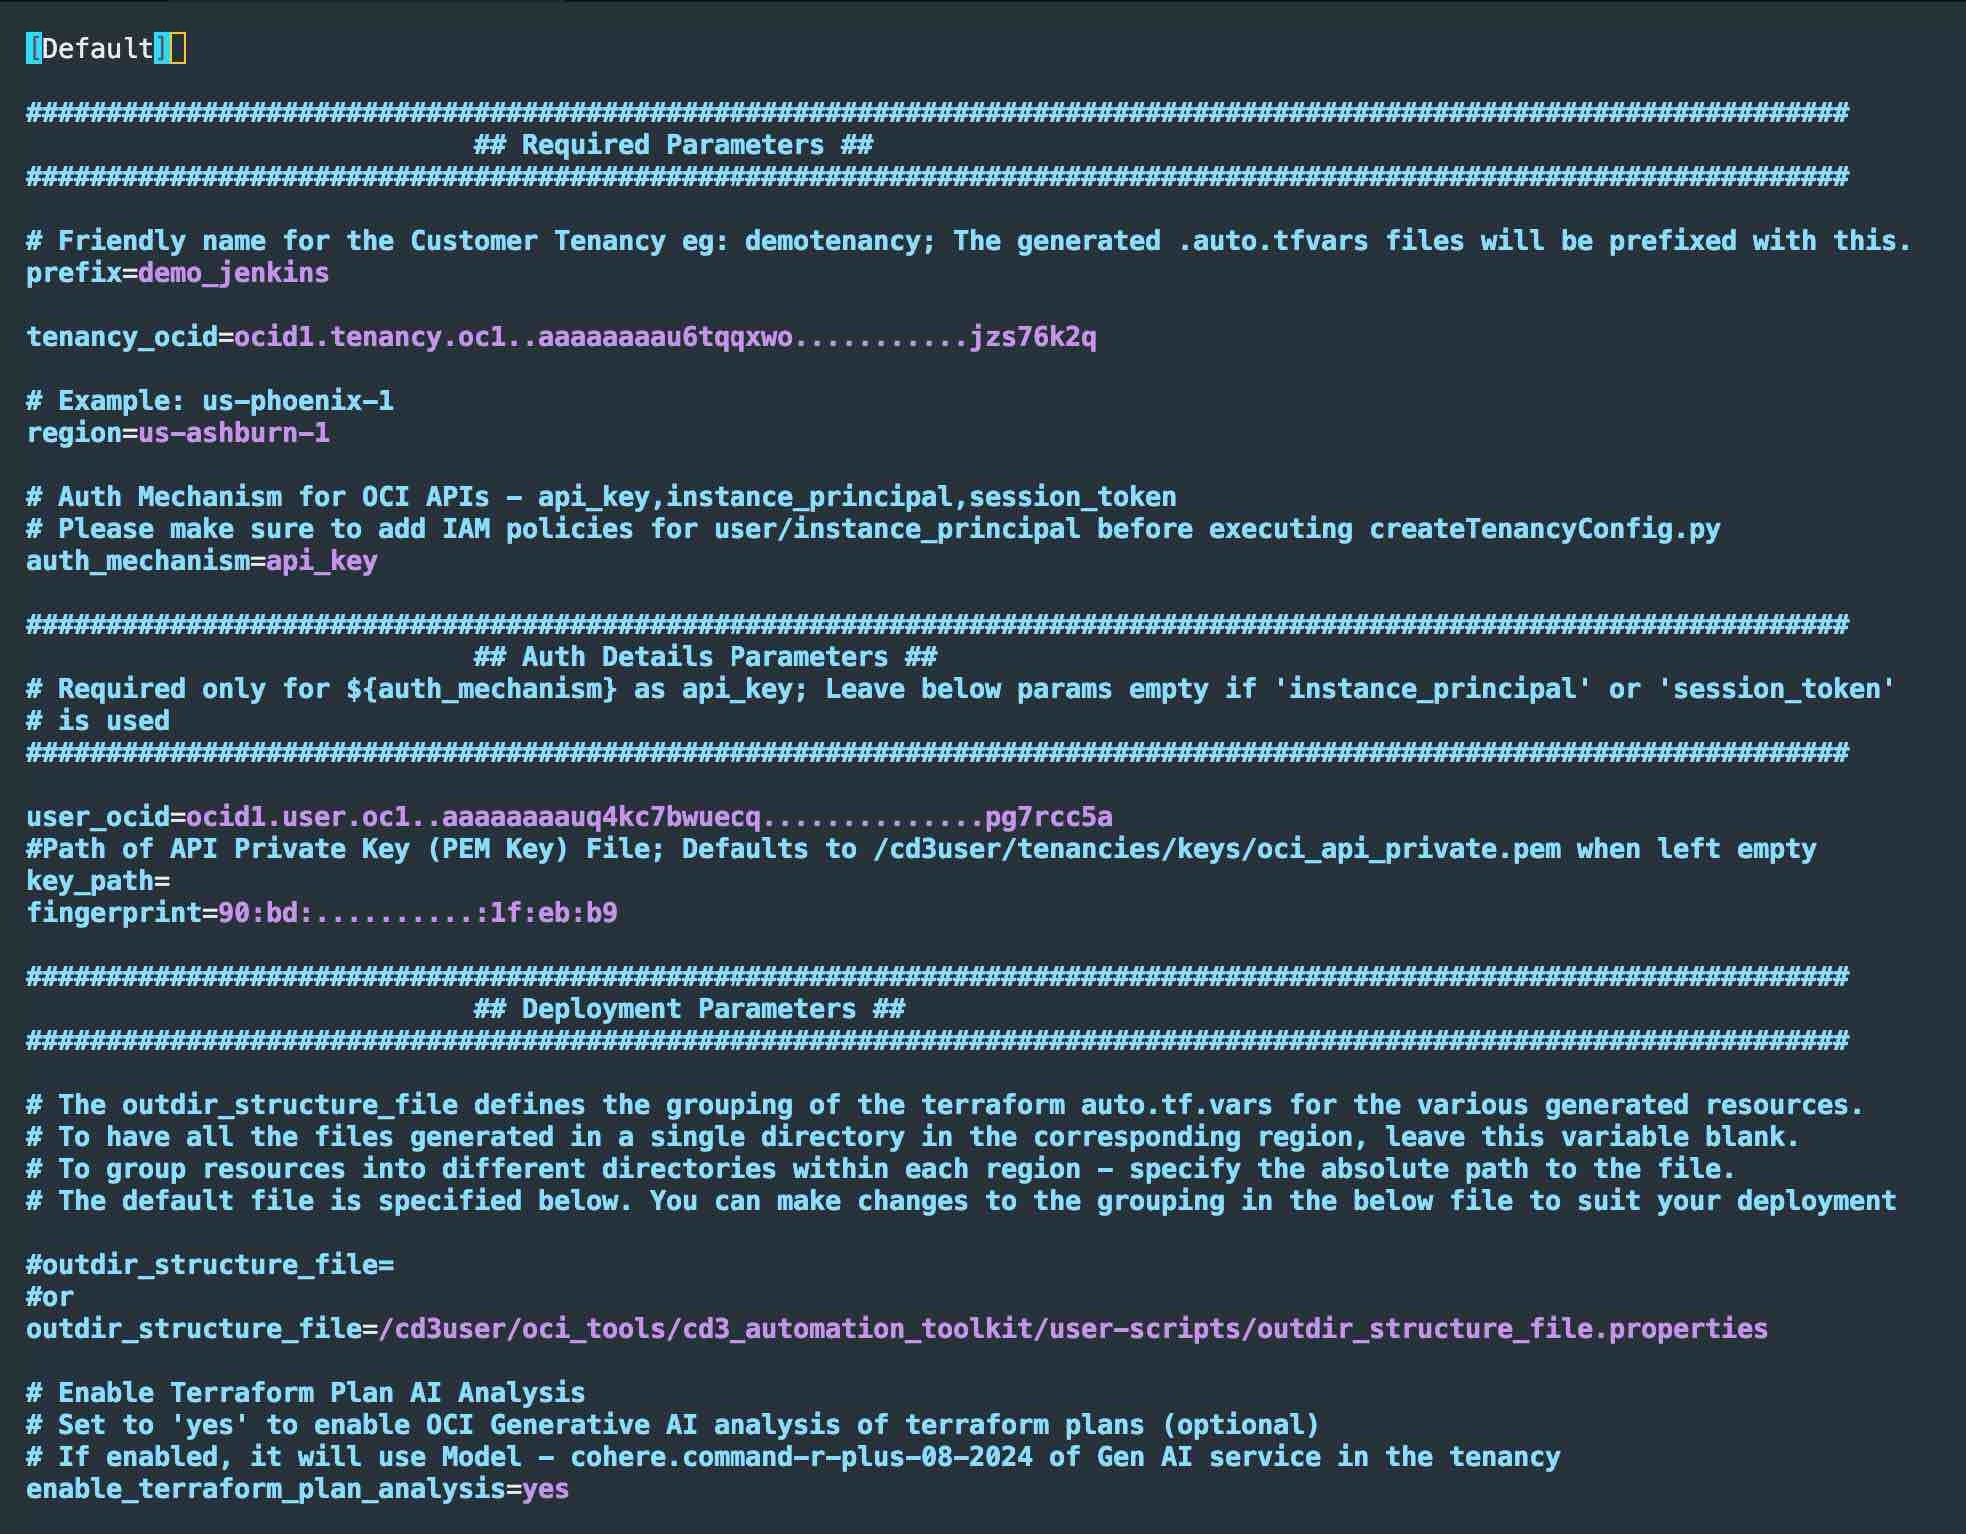
-
Update
enable_terraform_plan_analysisparameter value as required. -
Under Advanced Parameters for DevOps, Provide a compartment ocid to create the supporting resources. Select
yesfor theuse_remote_stateanduse_oci_devops_gitparameters.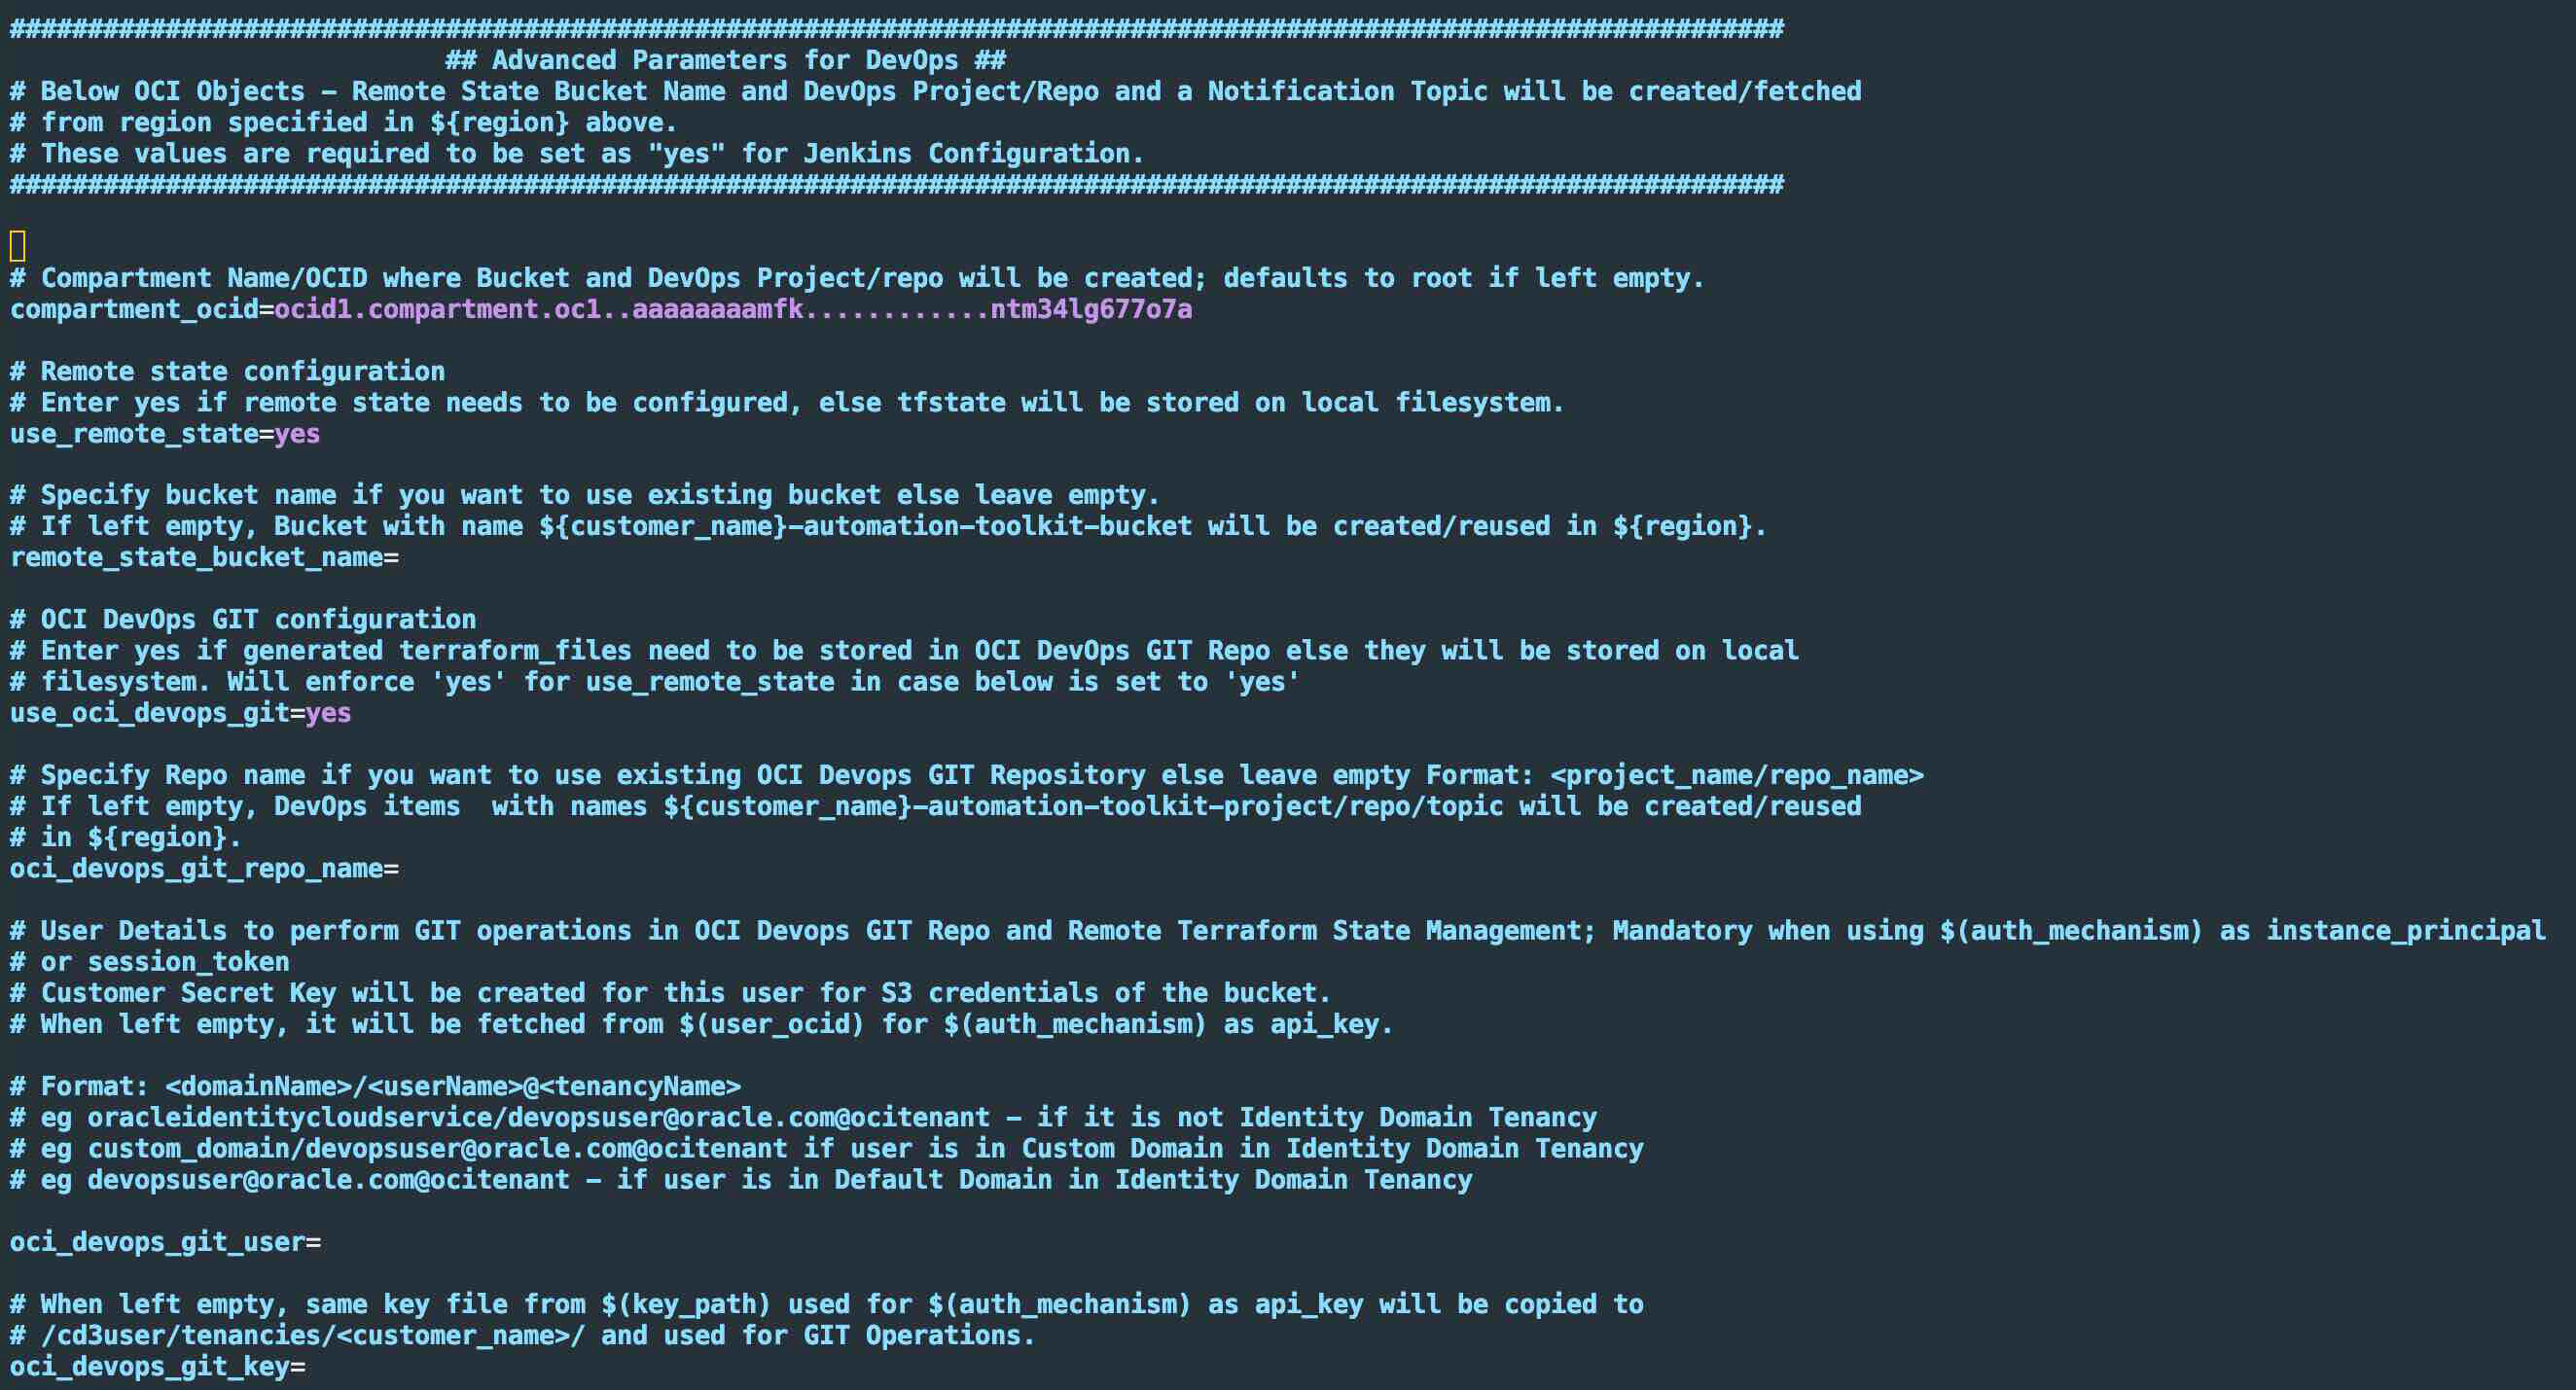
This will create an OCI DevOps Git Repository for the generated terraform files, OCI Object Storage bucket for the state file and an OCI Notification topic to notify for the changes in DevOps repo.
-
Save the file and run
connectCloud.py ocito initialize the environment and start using CD3. -
Verify that the initialization completes successfully.
After the environment is initialized, proceed to Task 3 to create OCI resources or Task 4 to export existing OCI resources.
Task 3: Create Resources in OCI
Task 3.1: Prepare Excel and Variables File
-
Download the prefilled Excel template and update the Region and Compartment values to match your OCI environment
-
Open
/cd3user/tenancies/<prefix>/terraform_files/<region>/compute/variables_<region>.tffrom the container. Under theinstance_ssh_keysvariable, add the SSH public key variable referenced in the Excel template (ssh_public_key) and assign the corresponding key value.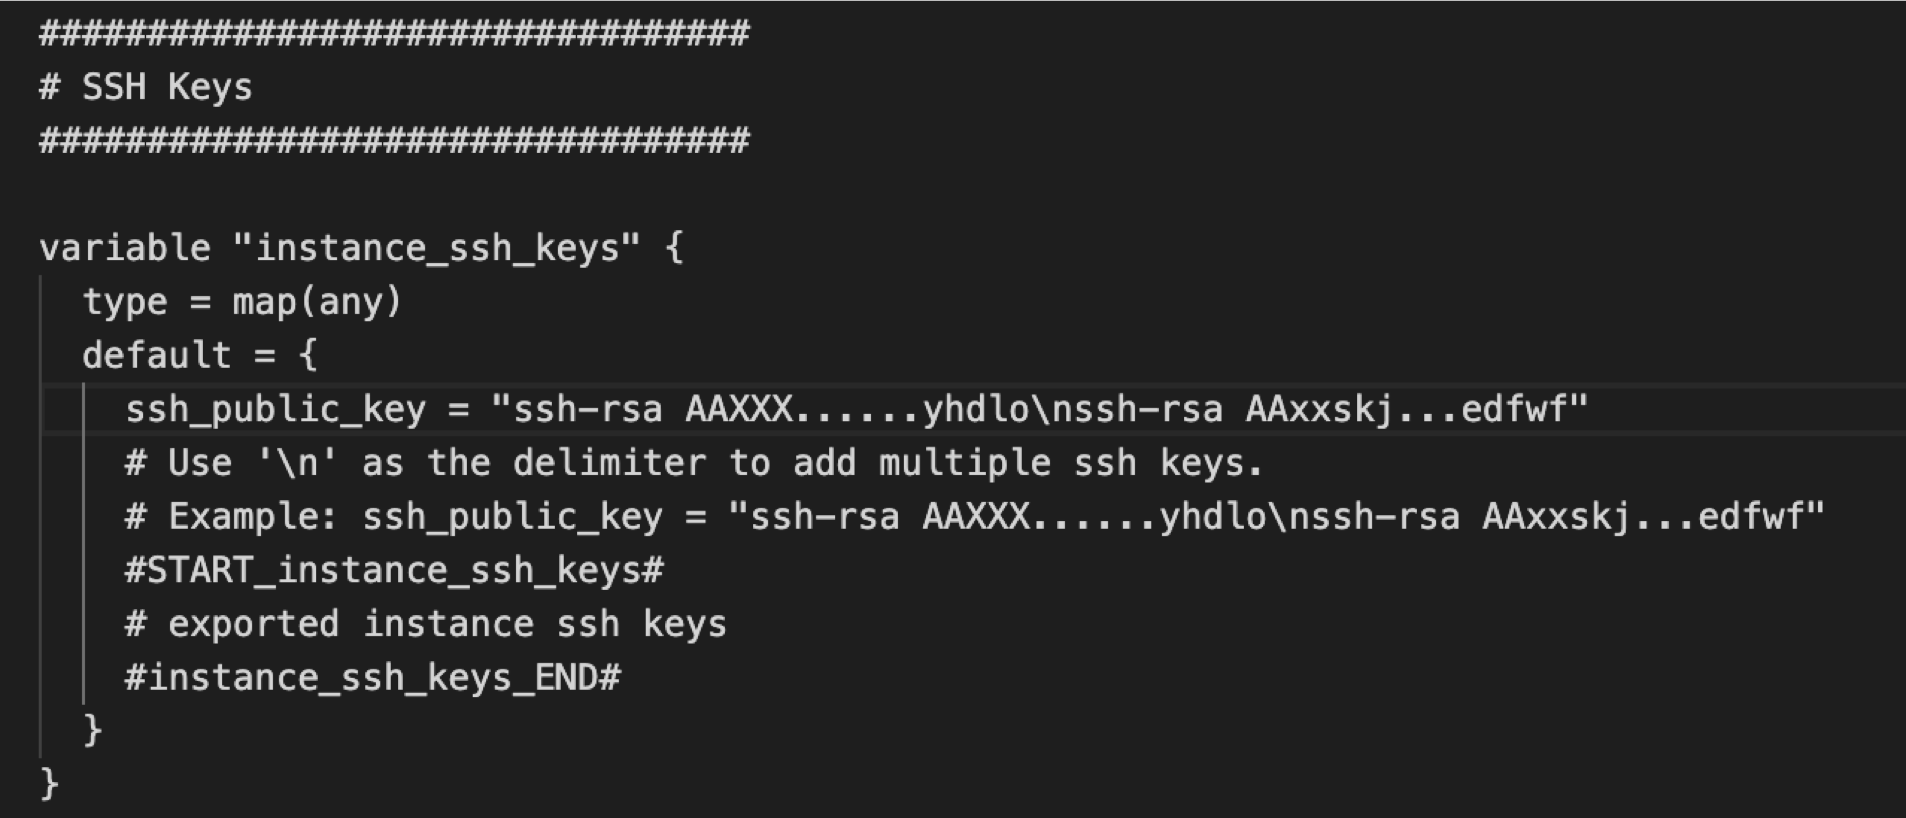
-
Under the
instance_source_ocidsvariable, add the source image variable referenced in the Excel template (myimageocid) and assign the corresponding image OCID.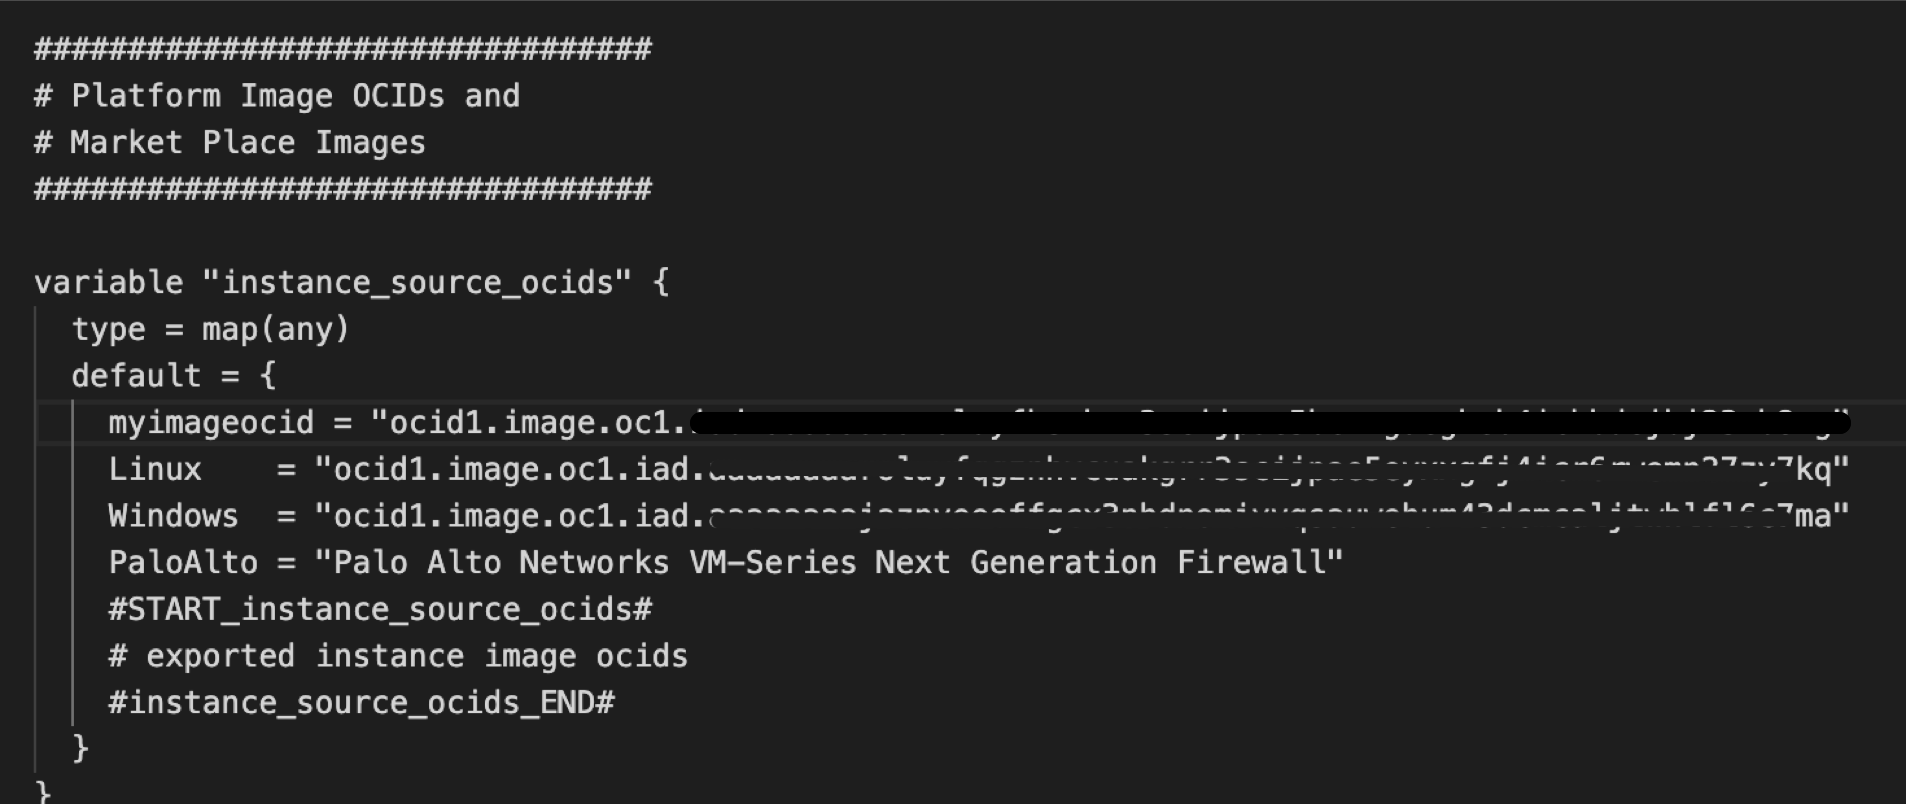
-
After updating the Terraform variables, run the following commands to synchronize the local changes with the OCI DevOps Git repository:
Task 3.2: Log in to Jenkins and Execute setupoci Pipeline
-
Start Jenkins and access it using the following commands from the container.
-
To start Jenkins, use the
/usr/share/jenkins/jenkins.sh &command. -
To access Jenkins, use this url
https://<IP Address of the machine hosting docker container>:8443. -
Log in to Jenkins. On the dashboard, folders with
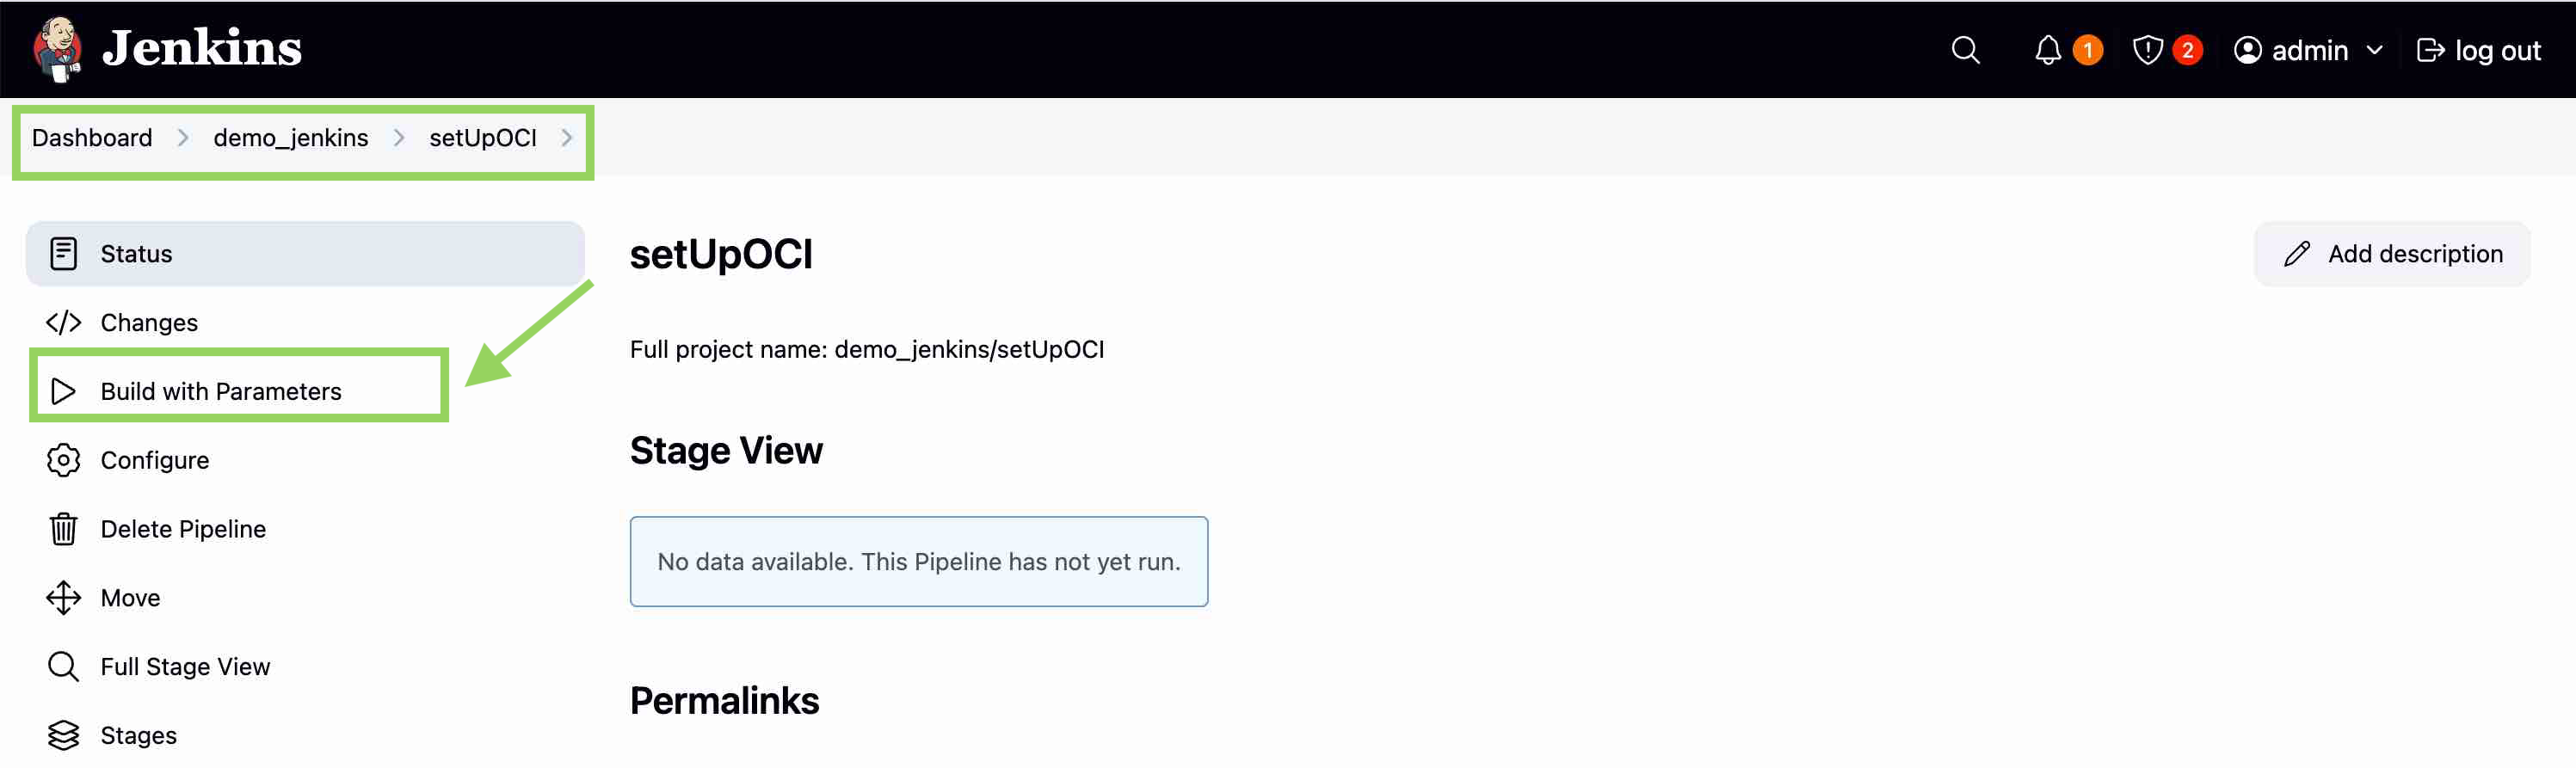
<prefix>names are present. Click the<prefix>name you are working with. It has the corresponding setupoci pipeline andterraform_filesfolder. Click setupoci pipeline and Build with Parameters.Note: If accessing the Jenkins URL for the first time, set up log in credentials.
-
Under the Excel template section, upload the excel file fetched in Task 3.1.
-
Under Workflow, select Create New Resources in OCI (Greenfield Workflow).
-
Under MainOptions, select Identity, Network and Compute.
-
Under SubOptions, select Add/Modify/Delete Groups, Add/Modify/Delete Policies, Create Network, Add/Modify/Delete Instances/Boot Backup Policy.
-
Click Build. The setupoci pipeline stages are executed in order.
Task 3.3: Provide Approval for Each Service Plan
-
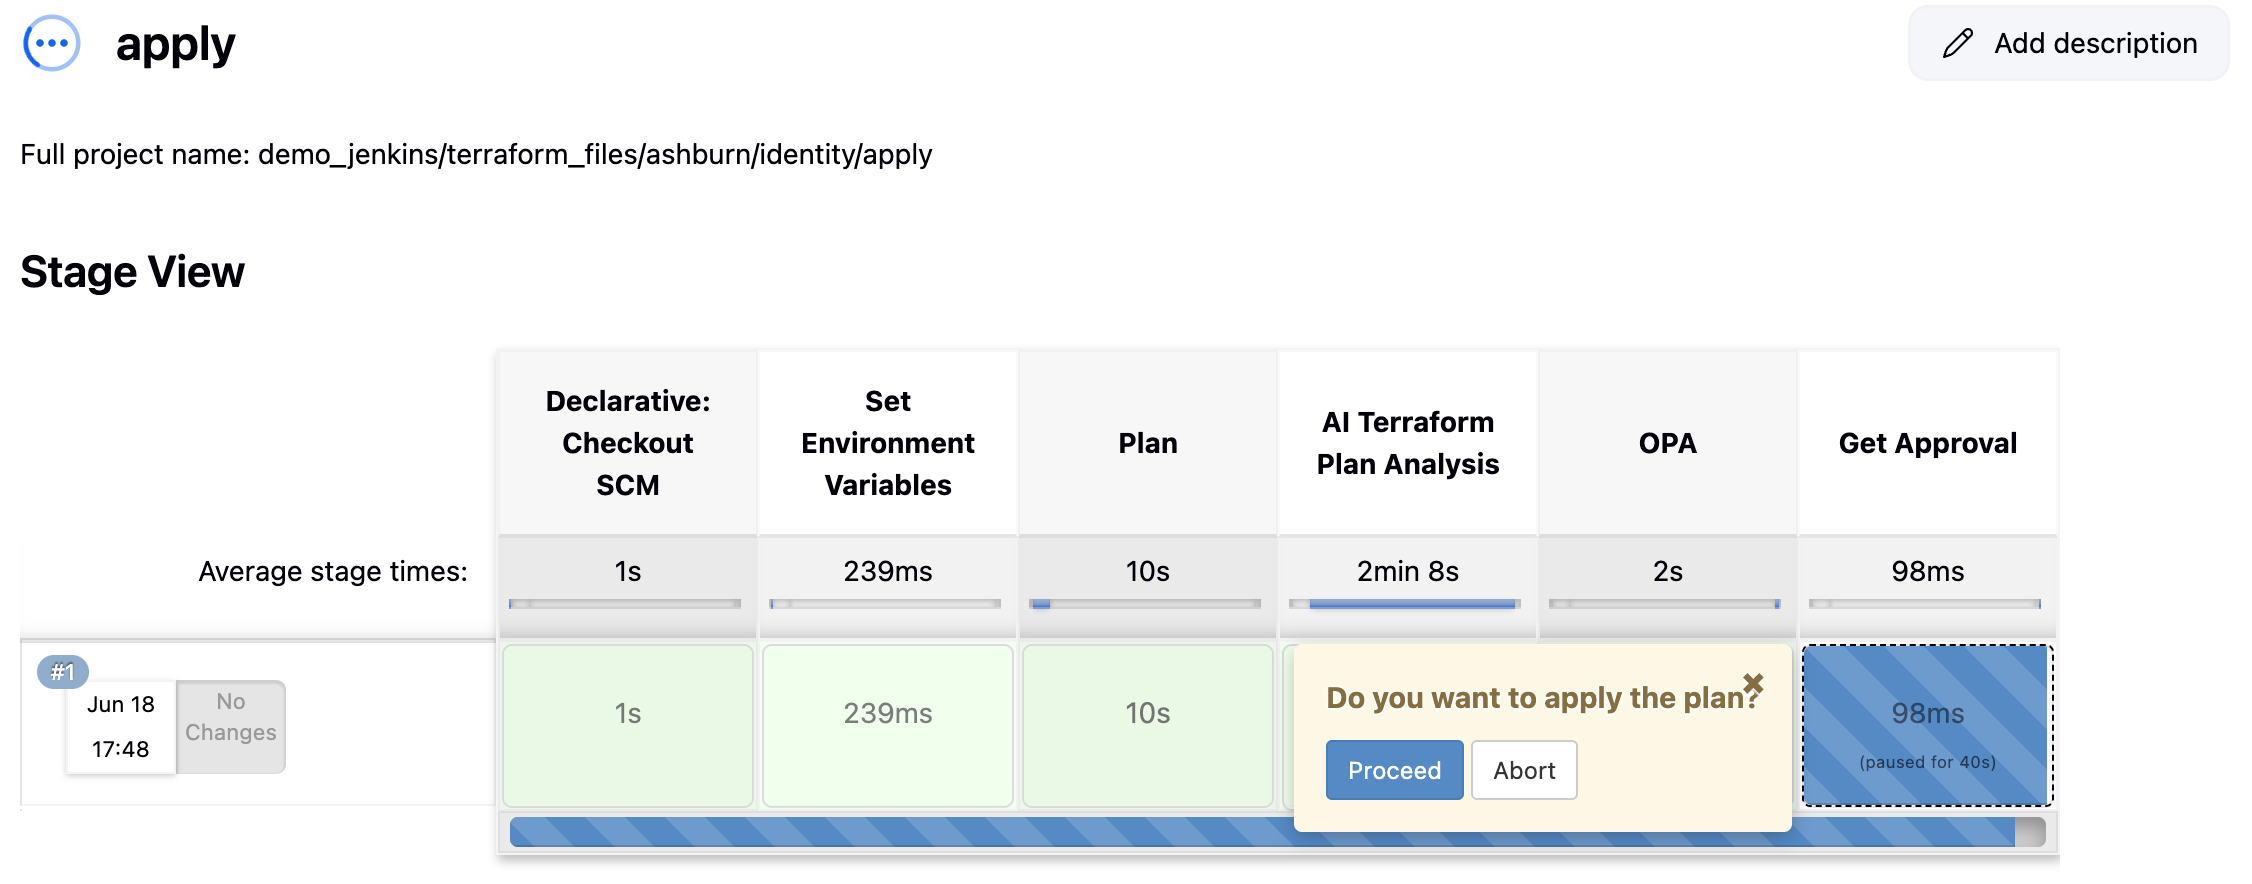
Click on the identity stage for logs and click on the link to identity apply pipeline build. Under Get Approval stage, click logs and select Proceed. Check the logs under Apply stage to verify the created identity resources.
-
Similarly, from the network stage in setupoci pipeline, click logs and then the link for network apply pipeline build. Under Get Approval stage, click logs and select Proceed. Check the logs under Apply stage to verify the created network resources.
-
Click the compute stage logs. Click the link to compute apply pipeline build.
Important: The initial Compute pipeline may fail because Network resources must be created first. Rerun the Compute pipeline after the Network Apply Pipeline completes successfully. The next step shows how to execute this.
-
Click Build Now for the compute apply pipeline. After the pipeline stages start executing, under Get Approval stage, click logs and select Proceed. Check the logs under Apply stage to verify the created compute resources.
-
Create Network generates Security/Route rules in the VCN that are not initially present in the CD3 Excel template (as these details are initially taken from the subnets tab).
To synchronize them to the Security Rules and Route Rules sheets in Excel file, build setupoci Pipeline again using the same Excel sheet as above, set workflow to Create Resources in OCI, select Network under main options and then the below sub-options.Security Rules ---> Export Security Rules (From OCI into SecRulesinOCI sheet), Add/Modify/Delete Security Rules (Reads SecRulesinOCI sheet) Route Rules ---> Export Route Rules (From OCI into RouteRulesinOCI sheet), Add/Modify/Delete Route Rules (Reads RouteRulesinOCI sheet) DRG Route Rules ---> Export DRG Route Rules (From OCI into DRGRouteRulesinOCI sheet), Add/Modify/Delete DRG Route Rules (Reads DRGRouteRulesinOCI sheet) -
Specify the Compartment name. Click on Build and the setupoci Pipeline stages start executing.
-
The Excel sheet will be populated with Security Rules, Route Rules, DRG Route Rules data. Terraform
tfvarsfiles are generated for these resources. -
The updated Excel file containing exported data from OCI is present under Build Artifacts of the particular setupoci build. The Excel file is also present inside the container under
/cd3user/tenancies/<prefix>/. -
Click on the Network stage logs and click on the link to Network apply pipeline build. The terraform plan should show No changes inferring these services in OCI and CD3 are in sync.
-
This completes the resource creation process in OCI. Verify the resources that are created on the OCI console.
Task 4: Export Resources from OCI
Task 4.1: Download CD3-Blank-template.xlsx File
- Download the CD3 Blank template from here: CD3-Blank-template.xlsx.
Task 4.2: Log in to Jenkins
-
Start Jenkins and access it using the following commands from the container.
-
To start Jenkins, use the
/usr/share/jenkins/jenkins.sh &command. -
To access Jenkins, use this url
https://<IP Address of the machine hosting docker container>:8443. -
Log in to Jenkins.
Note: If accessing the Jenkins URL for the first time, set up log in credentials.
Task 4.3: Execute setupoci Pipeline
-
On the Jenkins dashboard, folders with
<prefix>names are present. Click the<prefix>name you are working with. It has the corresponding setupoci pipeline andterraform_filesfolder. Click setupoci pipeline and Build with Parameters. -
Under the Excel template section, upload the Excel file fetched in Task 4.1.
-
Under Workflow, select Export Existing Resources from OCI (Non-Greenfield Workflow).
-
Under MainOptions, select Export Identity, Export Network and Export Compute.
-
Under SubOptions, select Export Compartments/Groups/Policies for identity and Export all Network Components for network and Export Instances (excludes instances launched by OKE) for compute.
Note: Add details under AdditionalFilters if required, to filter resources.
-
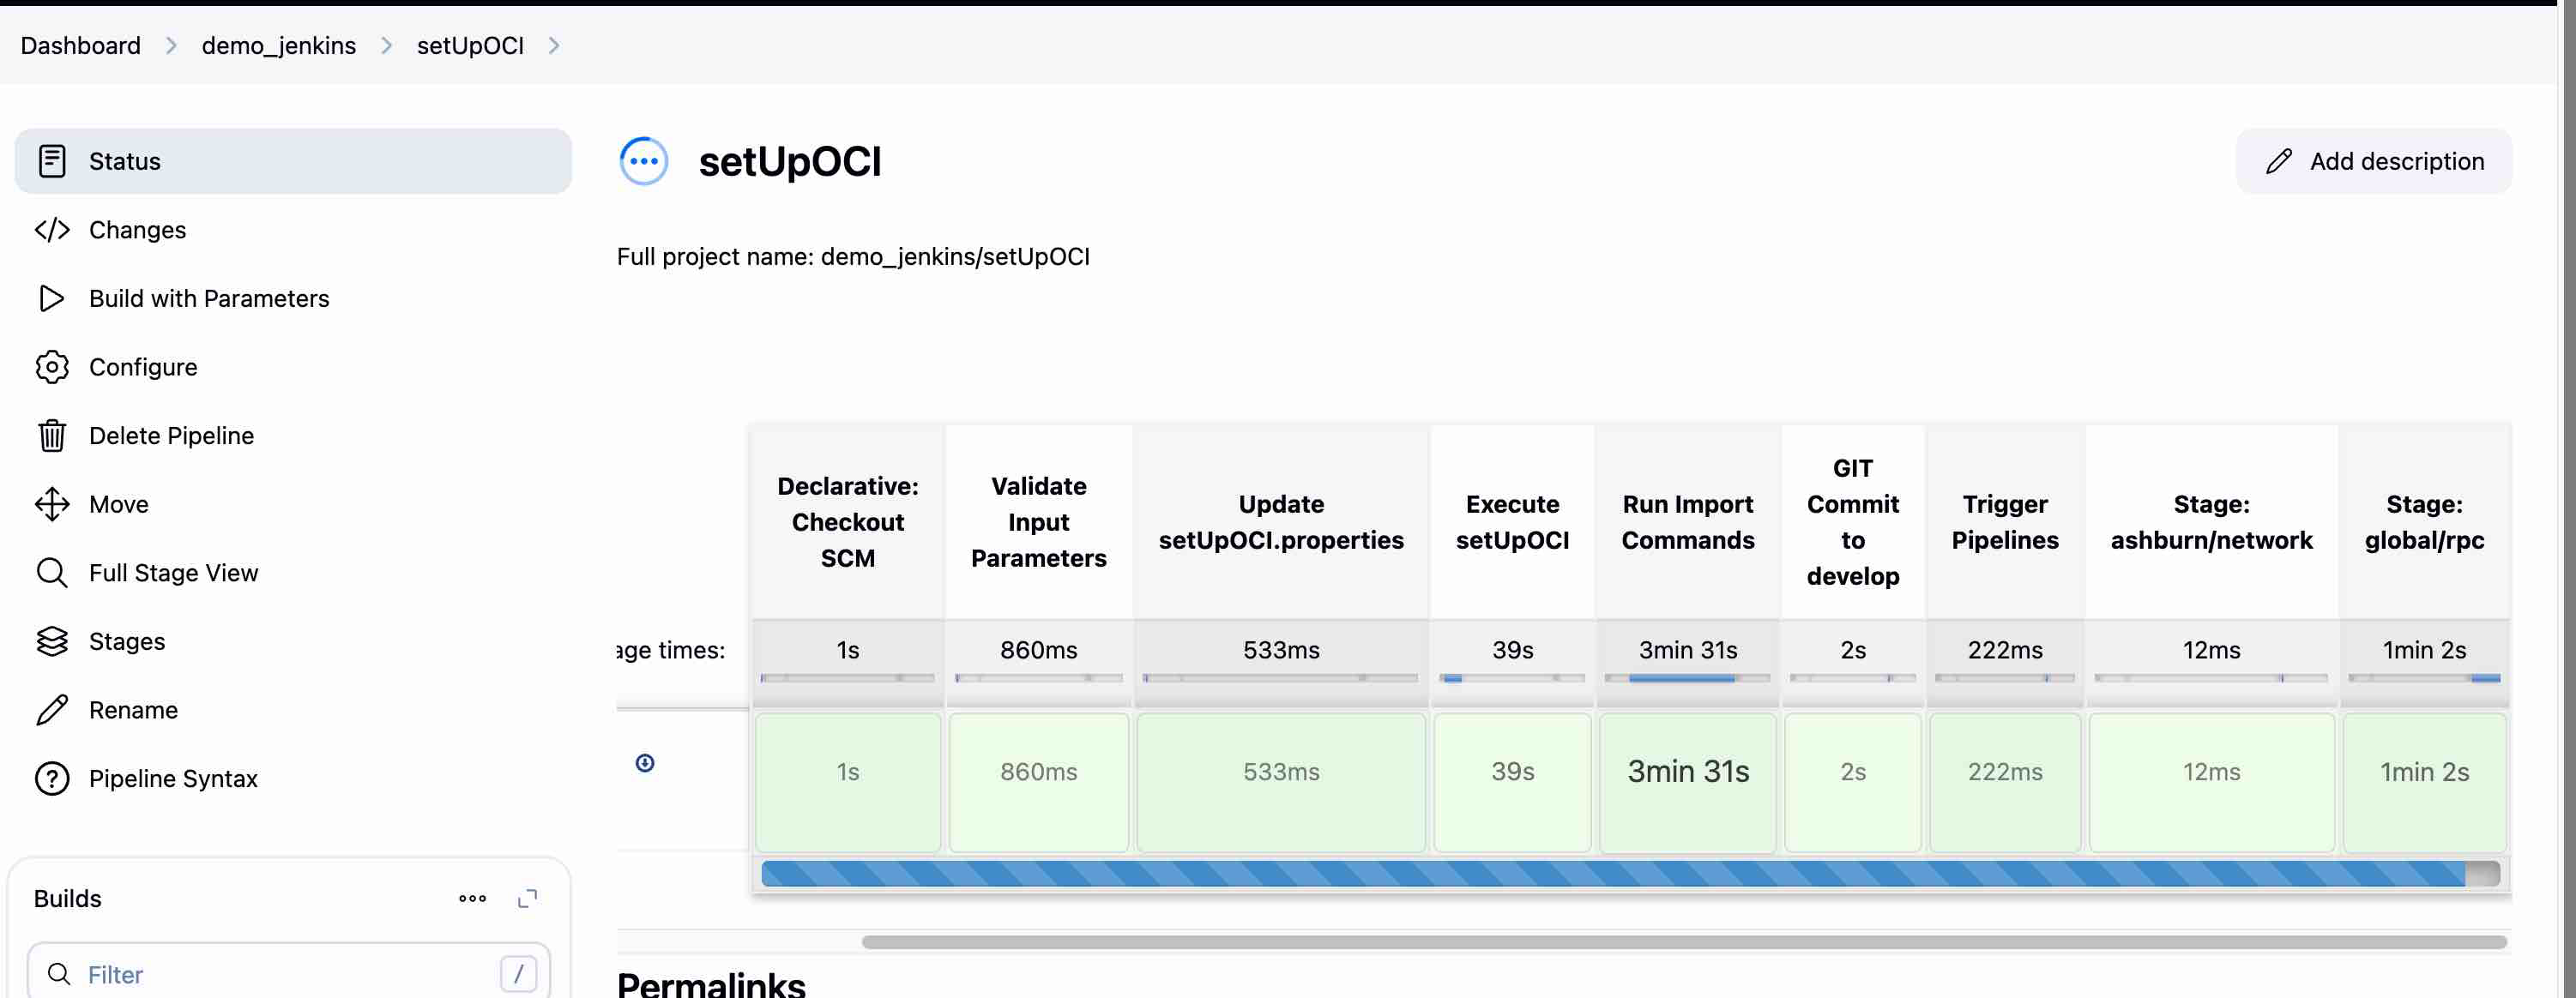
Click Build. The setupoci pipeline stages are executed in order for each of the services.
-
Check logs under Run Import Commands stage. If it shows as successful, the corresponding terraform pipelines Plan stage should indicate No Changes.
Note: If you find any changes in the plan, review them and apply as needed.
-
The updated Excel file containing exported data from OCI is present under Build Artifacts of the particular setupoci build. The Excel file is also present inside the container under
/cd3user/tenancies/<prefix>.